Predictable Iteration: Editing Essentials Using Chaos Veras

When you’re rendering in Veras, the results are amazing! But what about fine tuning the final image without familiar buttons for Copy, Move, Delete (and more)? Don’t panic! Simply “describe” what you want to happen. Here’s how!
Veras is fast, easy, and the results are beautiful. But the final image isn't always “exactly” right. You’re probably going to want to tweak things a bit - adjust a material, move an element, delete something from the scene, etc. In traditional applications, this process is well understood because there's specific buttons for editing your design. For example, consider the following editing options in your favorite design application. There's buttons for:
Add
Move
Copy
Mirror / Rotate
Replace
Change / Modify
Delete
However, it’s a bit different with Veras. There’s not specific editing buttons to accomplish many familiar editing tasks. Rather than select an object in the scene and then pick a command from the menu (move, copy, delete, etc.), you’re going to describe what you want to happen to the object(s) in the scene. This may seem a bit ambiguous at first, but it’s easy once you know how. Let’s get started!
Starting Image
As a starting image for each example exercise, let's use the rendering from a previous article for a bit of continuity (link). You can right-click to download the image below (Fig 01) or even use your own.

Fig 01 - Starting Image for Each Example
Add Command
When editing in Veras and you want to add something new, I've found it's better to keep what you already like from the original rendering, rather than restarting and prompting until you get exactly what you want. At each successful stage, it's also a good idea to download and immediately upload your preferred rendering before the next step (this download / upload step seems to maintain the most image persistence).
In this example (Fig 02) I downloaded the image of a furniture arrangement.

Fig 02 - Preferred Furniture Arrangement
Next, the image in Fig 02 was uploaded to Veras in the Reference Panel as shown in Fig 03.

Fig 03 - Reference Panel with Preferred Furniture Arrangement
Prompt: please add the chairs and table in this image with the ones in the reference image.
TIP: As mentioned in previous articles, you don't just want to render one image at a time. For each example, I rendered four images, and then selected the most preferred result.
Here’s the four results (Fig 04):

Fig 04
And the preferred result (Fig 05):

Fig 05
Replace Command
When you want to replace an object with another object there's actually a few ways that'll work. I'd often use the DRAW SHAPES tool from the EDIT tab (Fig 06) to draw a shape around the object and then ask Veras to remove that object.
After removing the object, I would then ask Veras to add a new object. As you can imagine this process took longer than necessary.

Fig 06
Fortunately, there's a much easier process. Starting with Veras 4.1, you can use Reference Images in your renderings (Fig 07). The Reference Image can be use to apply a specific characteristic that you want to use in your rendering.

Fig 07
For the next example, let's replace the two chairs on the left with the chair on the right. But what if you don't have an image of the chair on the right?Simply take a screen grab of the image of the chair on the right (Fig 08)
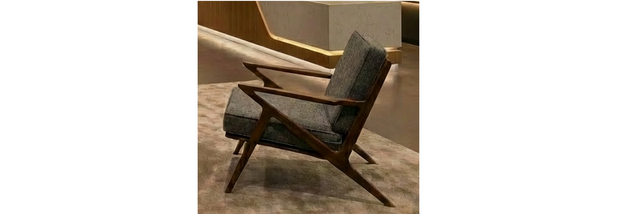
Fig 08
Then upload the screen grab to the Reference Image panel (Fig 09). Finally, use the image in conjunction with the prompt for the new rendering.
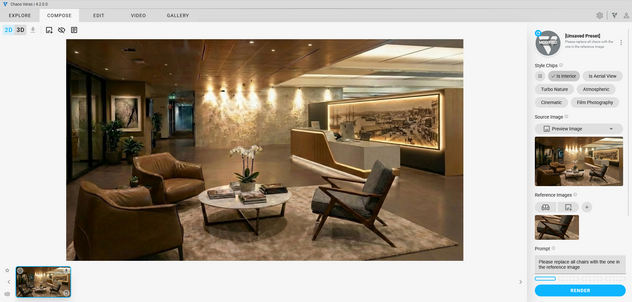
Fig 09
Prompt: Please replace all chairs with the one in the reference image.
Here’s the four results (Fig 10):

Fig 10
And the preferred result (Fig 11):

Fig 11
Delete Command
Sometimes you just need to clear a space or un-clutter a rendering. For example, the flowers and the books are a bit distracting to the overall space (Fig 12). In this example, let's clear everything off of the table in the seating area and in the same prompt, add something new to the scene.

Fig 12
Prompt: please delete everything on the table and instead put a flat white coffee on the table as well as a person sitting in front of it.
Here’s the four results (Fig 13):

Fig 13
And the preferred result (Fig 14):

Fig 14
Move Command
Similar to the steps above, being able to complete more than one request in a single prompt helps work flow evenly and saves render compute. As you become more comfortable with using Veras you'll soon learn when more than one request in a single prompt is likely to give satisfying results.
Rather than move individual elements, let's move the entire seating area toward the back of the room. Note that we're not using Shape Tool to highlight the seating area (Fig 15), something that would have been necessary with the previous render engine. Nano Banana is really good at understanding elements from a prompt using natural language.

Fig 15
Prompt: Please move the seating area to the back of the room.
Here’s the four results (Fig 16):

Fig 16
And the preferred result (Fig 17):

Fig 17
Mirror / Rotate Command
As much as I tried, prompting to mirror or rotate elements in a scene resulted in failure (Fig 18). I attempted each task three times and couldn't get anything close to be satisfying. Hopefully being able to predictably mirror and rotate objects will be possible in the future!

Fig 18
Copy Command
Using a copy command, the strategy that seems to be the most consistent is using the Shape tool. To do this, highlight the area and objects and then prompt Veras to place a copy elsewhere in the scene (Fig 19).
As with the previous Replace Command, I tried to take a screen grab of the elements and then use the image as a reference. Unfortunately, this strategy didn't have much success. The Shape provided the most satisfying and consistent results.

Fig 19
Prompt: please copy the seating area and add it to the background.
Here’s the four results (Fig 20):

Fig 20
And the preferred result (Fig 21):

Fig 21
Change / Modify Command
Overall, all of these editing tips are small strategies to create more predictable results. In this final step we only want to change the table. While you could re-render the whole scene with a different table, I found this frequently leads to unexpected results. In my experience, the most consistent result comes from using a reference image (Fig 22) and an appropriate prompt. Once again, using the Shape tool wasn't necessary.

Fig 22
Prompt: Please change the table to the reference image.
Here’s the four results (Fig 23):

Fig 23
And the preferred result (Fig 24):

Fig 24
Final thoughts. "Prompting" commands to edit your rendered scene often gives predictable results.But perhaps there's still room for improvement. Conventional editing in design applications (using Copy, Move, Delete, etc.) may seem constrained compared to text prompts. But those commands are also very clear. I think we could learn something from our traditional design applications and use the best of both worlds: conventional editing buttons along side descriptive text prompts.
For example, being able to select an object by clicking on it and have the object highlight would be less ambiguous than having to describe or circle the object using the shape tool. And when your trying to work fluidly, having to stop and describe common editing commands seems to slow down the overall design process.
That's it! As you've just discovered, Veras is easy to learn, and the results are beautiful. But getting the perfect image from a single text prompt is like winning the lottery - It just isn't going to happen. As a result, you're going to have to tweak your final rendering here and there to get the desired result. It might seem a little complicated to use text prompts in place of specific editing tools and buttons, but once you get the hang of it there's no going back! Have fun experimenting, and congratulations!
We hope this tips and tricks article helps you and your team get the most out of Veras. Questions, suggestions or comments? Please add your feedback in the comments section below! :) And don't forget to Sign Up for Enscape Monthly Updates!
ReadThomas would love to help you succeed with Veras, Enscape and your entire Chaos portfolio! Email us for a private demo or best practices webinar for your team. And when you purchase from ReadThomas, we’ll provide your team with complimentary training, implementation and support! www.readthomas.com.