A URL Is Worth A Thousand Words

Why model when you can describe? Why describe when you can copy? Stop overthinking! Quickly and easily replace paragraphs of descriptive text with a URL for textures, entourage, furnishings and more!
Sometimes trying to describe the perfect prompt seems like an impossible task. No matter what you type you can’t seem to get Veras to render what you want. But that's the first hurdle with using Veras - it only does what you tell it - not what you want. The following tips will save you hours this week and slip into your workflow with ease.
First, you need to get a baseline render. You don't need to start in 3D! In addition to rendering from all supported 3D applications, Veras has a web portal that you can use to started with a 2D image exported from your favorite design tool or even with a sketch that you photographed and uploaded to Veras on the web. Head over to veras.evolvelab.io to get started!
For this example, I downloaded a kitchen model from the SketchUp 3D Warehouse. After making a few design changes and cleaning up the model a bit, I properly framed the scene and was ready to start rendering with Veras. Here's the result (Image 01).
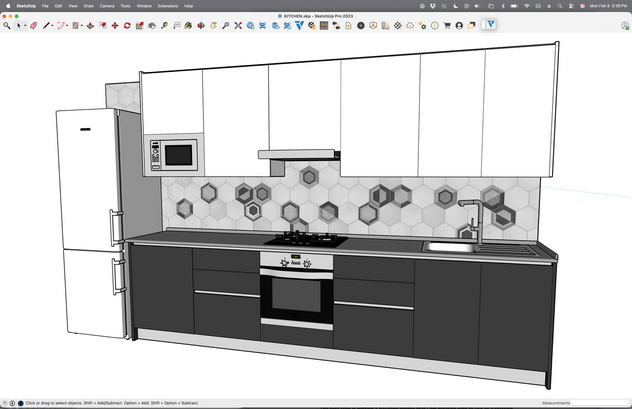
Image 01
After a few attempts with Veras, here's the baseline rendering that I liked (Image 02). Pretty good and natural looking result. I like the added a kitchen table in the foreground. The person working at the countertop gives the scene a sense of scale and function. The windows on the side allow some light into the scene - no modeling required!

Image 02
However, there are some features that need to be revised. Rather that make the changes, render, and repeat, I'm going to prompt the changes and rendering multiple options in a few seconds. Here's the three areas of the baseline rendering that need to be further refined.
Backsplash. The brown isn't working for me.
Fridge. Let's do something besides stainless steel!
Windows. Boring! :)
After searching for a bit, I found this tile from a local New Zealand supplier (Image 03). Here's the tough part - how would you describe these tiles as a prompt in Veras? You could struggle all day and not get the desired result. My dad (yeah, this guy) recons he's pretty smart with his degrees in architecture, Revit blah blah, Enscape yeah yeah. :)
But that's the problem! He's "smart". He's been using the computer for 3D modeling for 30+ years. His approach to solving the problem is how someone who's knowledgeable about computers goes about working. I didn't study Architecture - I studied Psychology. So I don't have his experience (and bias) about how the computer is supposed to work for architects and designers.

Image 03
Why describe when you can copy, right? Sure, I've played with Revit, SketchUp and Enscape. But I'm just getting started with Veras. My unbiased assumption of using the computer to connect 1) the material from the 2) supplier's website to 3) my rendering in Veras was the simple and elegant hack of 4) copying the URL (Image 04) . In Psychology we call this "Neuroplasticity". Maybe Architects should skip a a few studios and study more Psychology LOL! :)
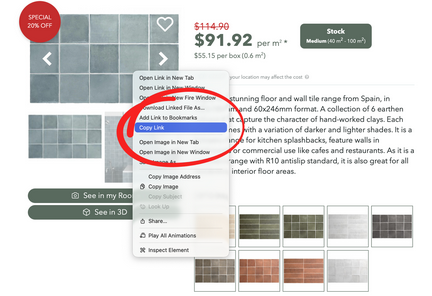
Image 04
Here's the result in Veras (Image 05). All I had to do was select Copy Link and paste it into Veras Prompt window with some instructions and Veras handled the rest. I didn't even have to spend time carefully selecting the tile - all the tile areas were selected and replaced with the single prompt. I was able to render the exact shape and shade of tile without having to spend a lot of time using trial and error. This process is much better than struggling to explain something very subjective when you already have an image online.

Image 05
Next, let's change the fridge with a more modern appliance that's not a natural stainless steel. Side note: I didn't study architecture but why is everything stainless steel? I prompted a simple and modern fridge, but Veras had trouble rendering the fridge accurately in the same location. Sometimes it would rendering another fridge in the scene!
Tip: Rather than prompt something into the scene, that's already in the scene, and expect Veras to replace it, use the word "change" or "replace" in your prompt.
After some trial and error I decided to select the area with the shape tool to "help" Veras understand where I wanted something to happen (Image 06). As a result, I was given more accurate results. It's good to remember that if you are not getting the result you want, sometimes its better to take a step back and try a different approach. More on this approach for locating and relocating existing entourage in a future update!

Image 06
And here's the result in Veras (Image 07). Once again, I used a URL of a fridge that I liked and added the keyword "change" to the prompt. Along with the defined area of the shape tool, Veras had no problem substituting the stainless fridge with the darker, modern version.

Image 07
Finally, let's add some curtains to the windows. After the first two results I was feeling pretty confident, but this ended up actually being a bit of a challenge! I kept prompting with a desired URL, but kept getting inconsistent and undesirable results. After so much success I was started to get frustrated! Turns out after just using Veras for only a short while, I was also guilty of getting too "smart". :)
Tip: Usually selecting "Copy Link" of an image works as expected. But not all URLs are created equal. For example, Amazon links don’t seem to work! Maybe there's too much metadata in some sites related to the image which confuses Veras. But simple links to images seem to work.
I originally prompted Veras to “Please add these curtains“ followed by the URL. No matter how many times I tried, the result was always something other than the curtains I expected. Then it hit me - I was giving Veras too much information. I was using the word "Curtain" in the prompt along with an image that even a child would understand as curtains. Too much information!
What worked? Simply removing the word "curtains" from the prompt. Immediately after this subtle change, Veras rendered the curtains even better than I expected. I only provided a link to the URL of the curtains, but one of the options Veras created had a shade between the curtains (Image 08). Nice touch! This is what I like about designing with Veras - sometimes I was surprised with a better result than expected.

Image 08
Lesson #1: Rendering with Veras can give you beautiful results in a matter of seconds, but like any tool it can take some time to truly understand how it works. The problem often arrises when you overthink the prompt and give Veras too much detail. So don't describe when you can copy a URL. Let's face it - a URL is a far better description than you could come up with using text!
Lesson #2: Using Veras opens up beautiful design visualization to people that don't know how to model or render with complicated software. Anyone can start with a sketch, a photograph, even a composition of physical objects like blocks, LEGOs, and more. Sure, people are skeptical of AI. But to me (and remember, I didn't study Architecture) it seems like AI and Veras is allowing people to design like people used to design before complicated 3D software came along. By sketching!
That's it! We hope this tips and tricks article helps your team get the most out of Veras and Enscape. Questions, suggestions or comments? Please add your feedback in the comments section below! :) And don't forget to Sign Up for Enscape Monthly Updates!
Here’s the link to download the sample file.
ReadThomas would love to help you succeed with Veras, Enscape and your entire Chaos portfolio! Email us for a brief, private demo or best practices webinar for your team. And when you purchase from ReadThomas, we’ll provide your team with complimentary training, implementation and support! www.readthomas.com.
More from the author → Emerson Read on LinkedIn