Rendering For The Rest Of Us Who Don’t Know How To Render: Chaos Veras!
Are you an architect, interior designer, or engineer who doesn’t know how to use complicated 3D software, rendering apps, photo editing and more? This article is for you! Creating compelling concept images and beautiful renderings of your project is only 30 minutes away. Grab a coffee and read on!
Architects, interior designers, and engineers have to communicate concepts to clients, communities, and other project stakeholders without considerable time and budget to make complex renderings and images. Up to this point, how do you render if you don't know how to render? By asking someone who does (carbon-based AI ;).
Here's how it works: you discuss the project and hand over some preliminary sketches. And then you wait. After reviewing the first draft, there's always a few tweaks. And then you wait some more. A day or more passes. If only you could do it yourself! While you may not know how to render, you do know how to compose and describe. What if you could take your composition and description and render Let's use the example of a civil engineer who requires concept image for a feasibility study. All you need to get started is a screenshot of a 2D plan or 3D orthographic image. Maybe you have an image of a similar project for reference? You could even start by hand-drafting in plan and then prompting a 3D rendering (like this).

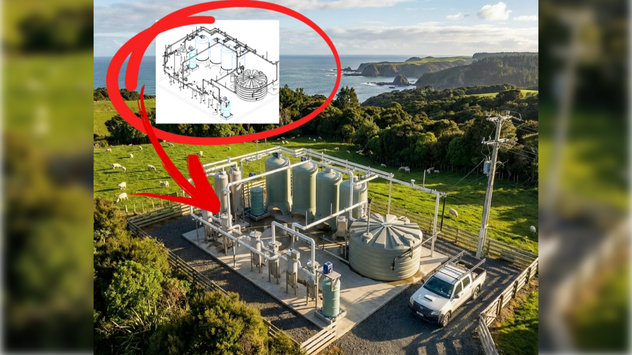
Fig 01
For this tutorial, we'll use a reference image of a water treatment system (Fig 01).
Next, log into your Veras account or trial on the web: https://veras.evolvelab.io/
Select the “Upload Image” or Drag and Drop the image into the main window (Fig 02).

Fig 02
Once you've uploaded the reference image, it'll look like this (Fig 03).
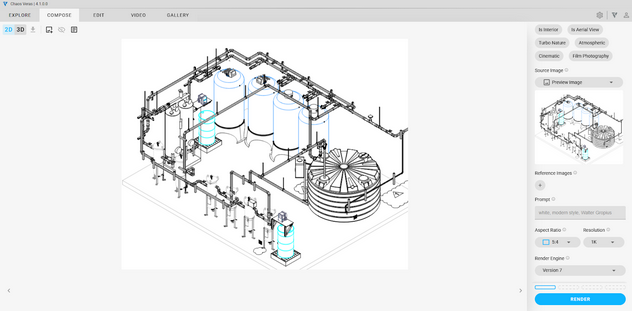
Fig 03
Select the Compose tab from the upper left. Then, from the lower right panel, confirm the Aspect Ratio, Resolution, and Render Engine as shown below (Fig 04).
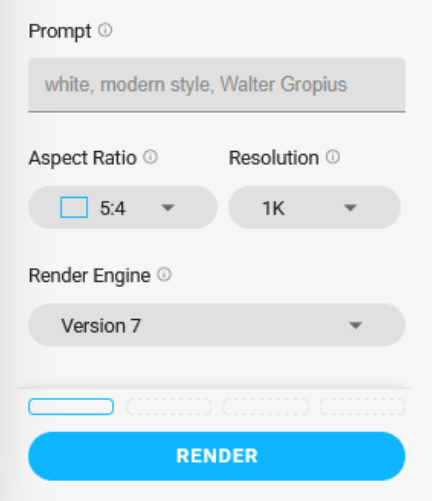
Fig 04
TIP: Rendering 1K resolution is the fastest and most efficient use Veras render credits when using Render Engine Version 7. Only render 4K resolution as a final step if you need a higher resolution image.
Now you're ready to add your "prompt" for the rendering. A prompt is just a fancy way of describing the project, desired result and other context. A good starting point for a prompt is like a conversation, where you're describing what you need from your associate who knows how to render. Just start with the basics! I'll often use dictation software for describing rather than type. I'll just use Siri, then copy and paste the resulting text in the Veras prompt window.
Here's an good list of questions to consider when creating your prompt. The questions in the list below gives important context for the rendering.
Who Are You?
Why Are You Rendering?
What Are You Rendering?
Where Is The Project?
When Is The Rendering?
Example prompt:
“I'm a civil engineer, rendering concept images for a feasibility study of a water filtration project on the coastline of New Zealand. It's a private farm and the ocean is visible in the distance. The farm is a cattle and sheep station. I'd like a photo realistic exterior perspective birds-eye view in the late afternoon with a partly cloudy sky with the ocean in the distance in order to create concept images for the property owner and local council as part of a feasibility study document.”
TIP: Don't press the RENDER button once and wait. Press the button three or four times in order to create a few options. Then select the preferred image for additional editing and continue.
Now you're ready to render! Press the RENDER button 3-4 times to get a couple of options. They'll all be slightly different, which is a good thing! Select the preferred image from the list of thumbnails below the main image (Fig 05).
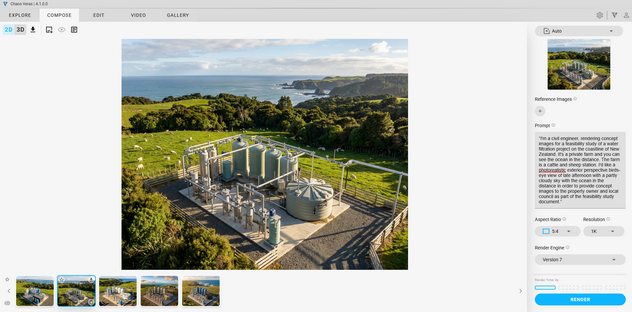
Fig 05
Don't expect the first batch of images to be perfect. You'll likely need to modify the image a bit (just like with your carbon-based associate :). Let's add a bit more detail and realism with a new prompt containing a list of the desired features (Fig 06):
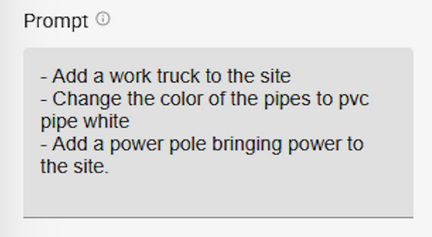
Fig 06
Here’s the final result in Veras (Fig 07).

Fig 07
And the final rendering by itself (Fig 08).
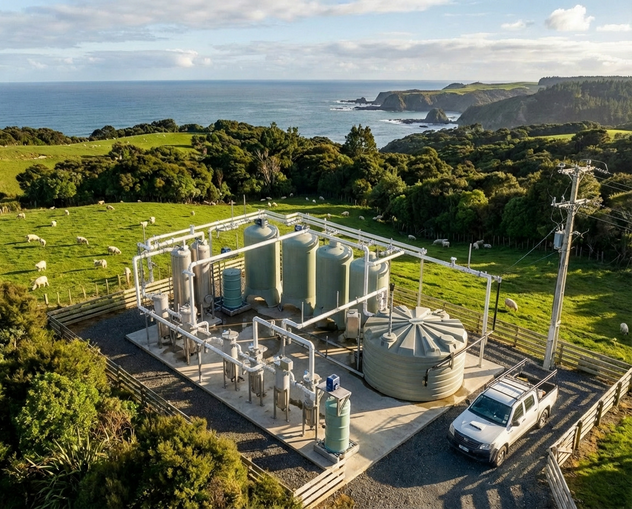
Fig 08
But wait! There's more!™ :) You don't have to settle for a photo-realistic image. With the final image selected, add the following prompt: "remove the background and create a pencil sketch with a splash of color for the tanks and other features"
Press the RENDER button 3-4 times. Here's the result (Fig 09).

Fig 09
Finally, here's the downloaded image from the thumbnail panel at the bottom of the screen. Ready to drag and drop into your proposal document! And the best part? Your coffee isn’t even cold! :)

TIP: Creating illustrations using Veras doesn't have to be photorealistic. You can also prompt sketches and non-photorealistic images!
We hope this tips and tricks article helps you and your team get the most out of Veras. Questions, suggestions or comments? Please add your feedback in the comments section below! :) And don't forget toSign Up for Enscape Monthly Updates!
ReadThomas would love to help you succeed with Veras, Enscape and your entire Chaos portfolio! Email us for a brief, private demo or best practices webinar for your team. And when you purchase from ReadThomas, we’ll provide your team with complimentary training, implementation and support! www.readthomas.com.
More from the author → Emerson Read on LinkedIn