Chaos Veras: Perfect for Creating "Imperfect" Renderings
"Perfect" renderings aren’t necessarily perfect. Imperfections and little details can give images a more natural appearance, tell a better story, and provide important context that communicates the passage of time.
Sometimes you only need to communicates what’s in the design. This happens when you're presenting a narrative focused on emphasizing only the essential. This kind of imagery is typical of “serious” architectural photography. Any “clutter”, people, entourage, etc. that might distract focus from the formality of space, light, and form are removed. Only the essential remains.
Similar to "serious" architectural photography, rendering “perfect” images is straightforward because you're rendering directly from the design file. The design file (and minimal entourage) parallels what is being documented, detailed, and coordinated for construction. The rendering below is a good example of a formal image (fig 01). There is minimal entourage: books and tray in foreground, plants at edge and background. The painting at the center of the vanishing point, balancing the viewer's attention before being directed to the lighting, perspective, and overall composition,

Fig 01 - Formal Communication of the Intended Design
But what if the rendering needs to tell a different story? A story with empathy, activity, context, and the passage of time? Altering the design file by shifting carefully placed furniture, adding considerable amounts of entourage (people, plants, magazines, glasses) no longer parallels the design file. In fact, alternating the design file in such a manner will undo important detail and documentation necessary for construction. Deviating from the design file is just one of many challenges to telling less formal, more lived in story.
The other challenge is creating the little details. Of course, the Cosmos Library is full of useful content. But it’s still subtly and imaginatively limited. Consider the family checking into the hotel and standing at the reception desk, with luggage in tow. Did you notice the little girl? She's holding the edge of the reception desk, appearing to look upward and curious (fig 02). This is a remarkable amount of empathy for human behavior unavailable in the Cosmos Library. All of this detail can't and shouldn’t be forced on the design file, which serves a different purpose.

Fig 02 - Hey What's Happening?
Enscape and Veras gives you the best of both worlds. In other words, let the design file serve its intended purpose of coordination, information, and documentation, while exploring and rendering the formal results in Enscape. When you need to communicate beyond design in order to express activity, context, and the passage of time: use Veras.
Here's a step by step walkthrough of the process. Let’s start with a clean and realistic image of an office conference room (you can imagine this is a rendering from Enscape). Notice the formal arrangement and symmetry? This kind of image is easily parallels the design documentation! From this starting point, we'll use Veras to make the space appear more casual and relaxed. In a word: natural.
To begin, open Veras on the web and upload the image (fig 03).

Fig 03 - Starting Image
In order to better see the resulting activity, let’s alter the orientation of the starting view. This can be done in Veras without returning to the design file, moving the camera, saving a new image, etc. Let’s ask Veras to move the camera higher.
Prompt: Please create a birds eye view of this conference room about 10’ off the ground.
Here’s the resulting image (fig 04). Veras even kept the reflection of the large screen at the far end of the table.
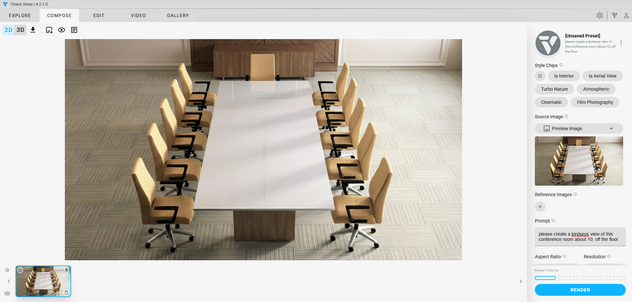
Fig 04 - Elevated View
Let’s start making some changes, but we're not going to prompt everything desired in the final image all at once. As previously discussed, it’s a good idea to prompt each step one at a time, rather than request all of the requirements in the final image in a single prompt.
Step 1. Let’s slightly alter the origin and orientation of the chairs.
Prompt: All of the chairs in this conference room are perfectly aligned, which looks too formal. Please slightly adjust the location and orientation of each chair to be different so the arrangement of the chairs is more informal.
Here’s the resulting image (fig 05).

Fig 05 - Adjusting the Chairs
Step 2. Next, let's give the conference room the appearance of a recently concluded architectural design review meeting.
Prompt: Please add a few objects to the table as if there’s just been a meeting in this conference room, note pads, glasses, a water decanter, pens, a set of architectural drawings in the middle of the table.
Here’s the resulting image (fig 06).

Fig 06 - Design Review Meeting
Step 3. Veras did what we asked, but perhaps a bit too much. :) Let’s clean up the image so there’s not so much clutter. We’ll use the shape tool (fig 07) and highlight the elements to be removed from the rendering, leaving less room for error.

Fig 07 - Removing Some Clutter
Prompt: Please remove the trashcan and clutter on the floor as well as the model on the table.
Here’s the resulting image (fig 08).

Fig 08 - Clutter Removed and Final Image
Now, take a moment and reflect on the final image above. We think you’ll agree this kind of detail shouldn’t be rendered directly in the design file. If you did, you’d have to remember to put everything back: chairs in their original position, clear the table, and more! "But what about putting everything in this alternate rendering in a Design Option?" and hide it from the Main Model. Yeah - good luck! Don't call me when your Revit file bloats and crashes.
Now that we've established the reasoning and process of rendering imperfect images outside of the design file, let's create a few more before and after renderings.
For the next example, we won’t even start from a rendering. We’ll use a screenshot taken from Revit (fig 09). This is a perfect use case when using Revit LT, which doesn't allow for plug-ins for adding rendering tools, but you can export images taken in Realistic Mode (more over here). Fortunately, Veras isn’t just a plug-in for design applications. You can also use Veras on the web!
For this example, we're also going to attempt to be a little more poetic and descriptive within a single prompt, rather than prompt one change at a time. Yes - there are times when you want to break the rules. And because the sun happens to be shining and it's not raining in Wellington, New Zealand, I want to break the rules, get this article done, and go outside! :)

Fig 09 - Screenshot from Revit in Realistic Mode
Prompt: This is an office interior, the purpose of this render is to make the office look more professional and lived in. Please add organized papers and folders on the office tables, as well as coffee cups and family photos. Please very lightly decorate the desks with office appropriate decor. Office doors may be slightly open, and please turn on the lights. Do not, under any circumstances, add any new tables, desks, or chairs.
Here’s the resulting image (fig 10).
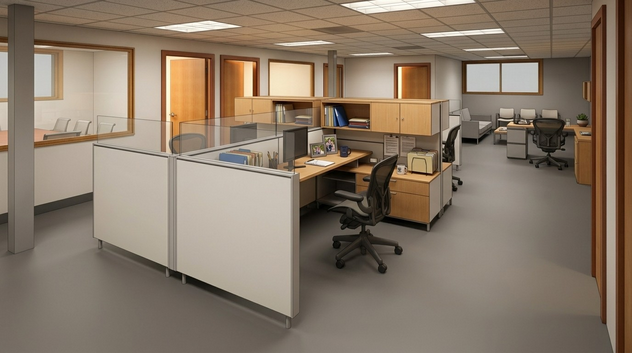
Fig 10 - Final Rendering from Revit Screenshot
The next example is a modern kitchen near the beach (fig 11). But you wouldn't know it from the rendering. Let’s add a bit of relaxed informality, and provide a sense of calm and context to our seaside getaway. A little “clutter” goes a long way!

Fig 11 - Formal Kitchen Rendering Devoid of Context
Prompt: This is a residential kitchen at the beach, I would like to render it so that it feels more natural and lived in. Please add subtle details such as dishes drying by the sink, a dishtowel hanging on the oven door, increase the texture of the cabinets, slightly deorganize the chairs, add a pair of flip-flops by the door, add some small beach appropriate decor on the kitchen island.
Here’s the resulting image (fig 12).

Fig 12 - Beach Sandals, Context and Carefully Placed Clutter
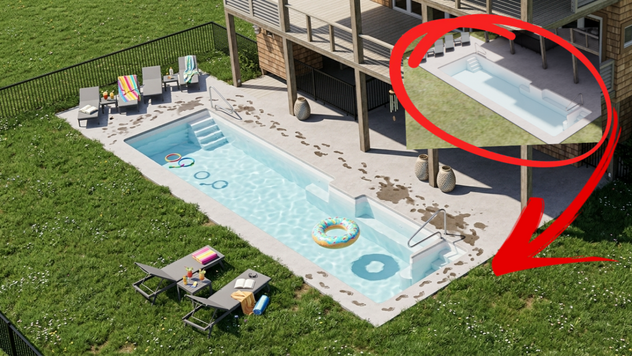
Here’s our final example from the same beach cottage (fig 13). The formal arrangement in the image obviously parallels design and documentation, with careful placement of lounge chairs and side tables. The arrangement perfectly mirrors the plan view. But if a tree falls in the woods and no one's there to hear it does it make a sound? Similarly if there's a pool at the beach and no one is swimming, is there really a pool? ;)

Fig 13 - Formal Rendering Mirroring the Design and Documentation
Prompt: This is an exterior pool attached to the back of a beach house. The purpose of this render is to make the pool environment seem more lived in. Please add some splash marks outside of the pool, add drinks on the tables next to the pool side chairs, please add beach towels, add wet foot prints from the pool ladders to the chairs, please add pool toys, please add light pool appropriate decor to the scene, photo realistic, please add grass to the outside.
Here’s the resulting image (fig 14). Okay, we didn’t ask for the extra lounge chairs on the grass. But once in a while, your silicon based AI (Architectural Intern) does something pleasantly unexpected, which turns out to be a happy accident. So I'm keeping it. :)

Fig 14 - Real LIfe is Messy
Lessons learned? Sometimes you only need to render what’s in the design. Clutter and entourage might distract focus from the formal presentation of space, light, and form. Rendering these kinds of curated or “perfect” images is easily accomplished and can be rendered directly from the design file. Nothing required for rendering deviates from plans, sections, and elevations.
On the other hand, sometimes you need to create renderings with more lifelike and causal, natural realism. These kinds of images convey empathy, and communicate how the space might be used. When you need to tell this kind of story, it's impossible to directly leverage the design file for rendering purposes. Altering the design file to create these kinds of renderings will bloat, break, and may even lead to crashing issues. For this kind of imagery, simply export a "perfect" image or rendering from your design file. Then use Veras to artfully dishevel the result.
The bottom line? There are times when you need to create "imperfect" renderings. And when it comes to creating “imperfect” renderings, Veras is perfect. :)
We hope this tips and tricks article helps you and your team get the most out of Veras. Questions, suggestions or comments? Please add your feedback in the comments section below! :) And don't forget to Sign Up for Enscape Monthly Updates!
ReadThomas would love to help you succeed with Veras, Enscape and your entire Chaos portfolio! Email us for a private demo or best practices webinar for your team. And when you purchase from ReadThomas, we’ll provide your team with complimentary training, implementation and support! www.readthomas.com.
More from the author → Emerson Read on LinkedIn