Design Iteration at the Speed of Now: Chaos Veras.
Got a great interior design rendering from Enscape and need to create additional design options? Veras is the perfect companion for creating beautiful and compelling design studies without taking the time to create perfect material textures and detailed 3D modeling.
Manually changing materials and geometry and rendering the results with Enscape is fast and flexible - and the results are beautiful. But this workflow depends on having materials and geometry available for use. What happens when you don't have the right materials or the time to build the necessary Revit families? Even if you did have the time, there's a lot of sunk cost in order to create the appropriate content for use in Revit.
Imagine if you wanted to illustrate 3-5 options with different materials, fixtures, furnishings, and more. If you can't find the right family components you'll have to model, and you'll also have to create the necessary material textures. All of this could easily take a day for each option. Now there's even a faster and more flexible workflow using Veras. This is because you don't need perfect material samples and geometry to visualize the design options. Easily the difference is hours vs. days. You do the math!
Here's how it works: Use Enscape with Revit (even Revit LT) or any of the supported design applications to create a baseline render in Enscape. Now you’re free to iterate without having to rely on perfect materials or geometry in Revit to create the additional design variations.
Why this workflow is amazing:
Works with Revit and Revit LT.
You don't have to search for or model the correct family components.
You don't have to search for or create perfectly aligned textures.
You don't have to spend time assigning textures, or swapping out geometry.
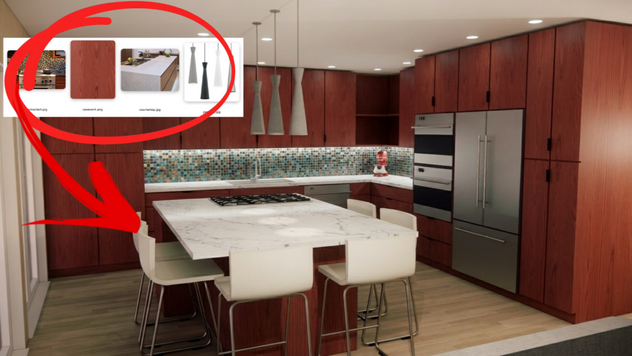
Let's get started with our baseline rendering below (fig 01). It's been created in Revit and rendered in Enscape (Note: If you're using Revit LT just save a screenshot like this). For this example, we’re going to create options for the 1) countertops, 2) backsplash, 3) pendant lamps, and 4) casework. Once you've created and exported your baseline render, go ahead and close Enscape and Revit. Let's open up Veras on the web at https://veras.evolvelab.io/

Fig 01 - Base Rendering from Enscape
Next, we’re going to use the following images to create the first iteration on top of our baseline render (fig 02). As mentioned previously, the textures don't have to be perfectly aligned and we're not using geometry for the pendant lamps. Any image is sufficient to iterate and Veras does the rest.

Fig 02 - Images for Iteration
Before uploading your baseline rendering take a look at the Veras Compose space (fig 03). Notice the Reference Image panel? That's where each of our images will be uploaded (or drag / drop), in order to replace materials and objects in the baseline rendering. You'll need a descriptive prompt to tell Veras where to swap out the appropriate material or object. But we'll soon discover a prompt may not even be necessary!

Fig 03 - Reference Image Options
Begin by uploading the baseline rendering in the main workspace (fig 04). Next, upload each of the images into the Reference Image section. The corresponding prompts don't have to be complicated. For example, for the image with the backsplash, simply prompt, "replace the backsplash".
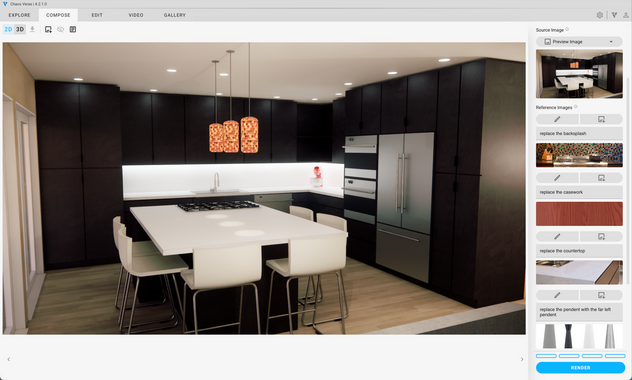
Fig 04 - Baseline Rendering
Make sure to use the "Custom" reference prompt for each of your Reference Images (fig 05).

Fig 05 - Custom Prompt Option
Depending on the image, you may have to be a bit more descriptive. For example, with the images of the four pendants (lower right in the next figure), we've added the prompt, "replace the pendant with a far left pendant" in order to specify which of the four pendants in the image we want to replace with the pendant in the baseline rendering (fig 06).

Fig 06 - Baseline Rendering and Reference Image
Go ahead and render four options. The preferred result is selected below (fig 07).
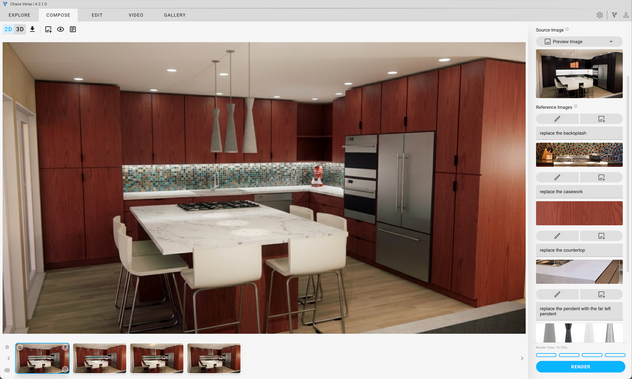
Fig 07 - Preferred Rendering Result
TIP: Once you render a baseline rendering with Reference Images, you can reuse the rendering in your gallery as a sort of template for a future project! Just reload the rendering from the Gallery, and you'll notice the baseline rendering, reference images, *and* prompts are ready to go!
Let's create another option on top of the baseline rendering. We'll use following images as references for the next option add them to the existing reference panels (fig 08). That's right! You don't have to start from scratch each time. Just drag / drop new images on top of the existing reference images.

Fig 08 - Images for Option 2
TIP: In some cases you may need to describe a material or object in the reference image in terms of size or scale if Veras can't determine scale from the image.
Here's the results from the second option rendering with the preferred result (fig 09).

Fig 09 - Second Iteration
Just to reiterate what we've done in the first two renderings, if the reference image contains a lot of other elements, you need to use a descriptive prompt. Otherwise, Veras doesn't know what to do. Veras may not replace the desired element in the base image with the correct element in the reference image. Additionally, Veras may also add entourage and other elements in the final rendering that you don't want. But it turns out you don't always need a descriptive prompt! :)
In third option, we're going to use images that contain singular elements. Therefore, we've cropped each sample image to isolate and highlight the desired material or object. Additionally, the file names of each image are edited to correspond to the element in the baseline render to be replaced (fig 10).

Fig 10 - Cropped and Named Reference Images
What we think(?) we've discovered is that if the reference image is cropped and properly named to correspond to what's in the image, you don't have to use a prompt. Just drag / drop each image into a Reference Image panel. The image name is enough detail for Veras to act accordingly. Maybe someone from the Veras team can verify (Ben? :).
And here's the result from rendering the base image, using only Reference Images without prompt! (fig 11).

Fig 11 - Design iteration Without Prompts in Reference Images
TIP: Now you can deduct drinks with friends by taking photos of materials, fixtures, and furnishings as project research. This is not tax advice. Please consult a professional.
What have we learned? Rendering with Enscape is fast. But for rapid design iteration, you'll need to have all the required textures and geometry components close at hand. What happens if you don't have the materials and components readily available? Taking the time to create the required assets could add days or more to your work. On the other hand, by using imperfect images of materials and objects, you can quickly and easily iterate multiple design options using a baseline image and Veras. And the results are beautiful!
We hope this tips and tricks article helps you and your team get the most out of Veras. Questions, suggestions or comments? Please add your feedback in the comments section below! :) And don't forget to Sign Up for Enscape Monthly Updates!
ReadThomas would love to help you succeed with Veras, Enscape and your entire Chaos portfolio! Email us for a private demo or best practices webinar for your team. And when you purchase from ReadThomas, we’ll provide your team with complimentary training, implementation and support! www.readthomas.com.
More from the author → Emerson Read on LinkedIn