No Plugin? No Problem! Use Veras on the Web with Revit LT!
Don’t worry about upgrading to pro versions just to use a rendering plug-ins. Use Chaos Veras on the web and save $$$ a year!

According to the AIA, 75% of Architecture firms have less than 10 staff - and over 25% of all firms are solo practitioners. Worksharing and a few other features aside, Revit is a considerable price premium compared to Revit LT ($3000 vs $560) if only to install plugins to render. But what if you could render in seconds from a screenshot or exported image? Now you can with Chaos Veras!
To get started, export an image of your project. Veras can be used inside of Enscape and there’s a direct plug-in for all supported design applications. For this article we are going to focus on using Veras on the web. If you don’t have Veras, you can start with a 14-day free trial over here.
Your project doesn’t have to be a building. You can even use Veras for rendering a civil project. For the example below, we’re going to render in stages, rather than all at once (for reasons that’ll become obvious later). Here’s the stages for our example project:
Create a base rendering of only the building and context
Add people and cars to the street level
Change the time of day to late afternoon
Add a formal evening reception to a select portion of the roof deck
At each stage of the rendering process, we’ll render 3-4 times to see some variations. Then we’ll select the most appropriate image to proceed to the next stage. If you don’t want to use your project image, feel free to download the image below (Fig 01).
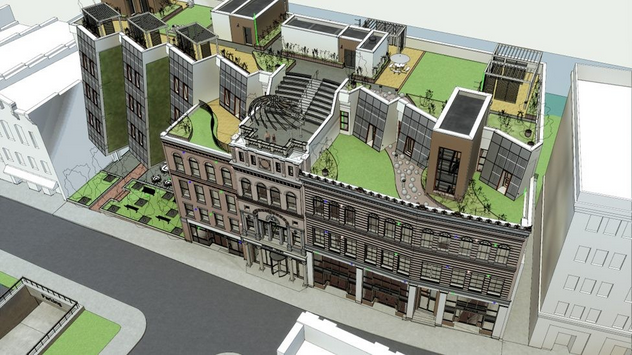
Fig 01 Base Image
Next, login in to Veras on the web at https://veras.evolvelab.io/. Fig 02 represents the default view after logging in to Veras.

Fig 02 Default Web View
Next, let’s upload the image. Drag and drop the image from your computer to the explore window, or upload by clicking on the Upload Image icon as shown in Fig 03.
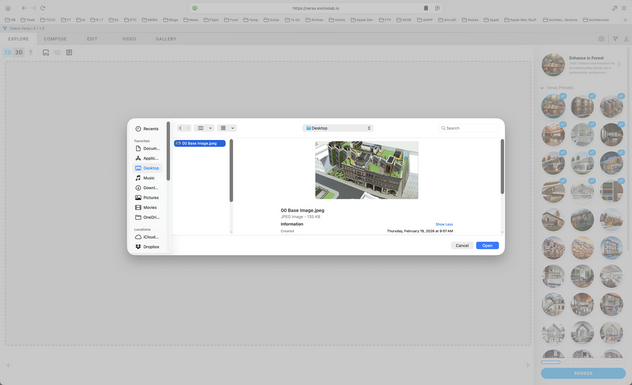
Fig 03 Upload Window
You’ve uploaded your image! The unrendered result will display as shown below (Fig 04).

Fig 04 Ready to Render
Get ready to render! But here’s the catch - if you were to put all of your requirements into a single prompt, you’ll get a lot of useful results, but likely some aspects of your rendering are undesirable. For this reason we’ll render in steps as previously described.
Next, let’s move on to the fun part: prompting. But here’s where it gets tricky, especially if you’re a deeply experienced technical expert. I’ve thought about this, and considering my degree in Psychology, I think it has to do with how you’ve developed your decades of experience. You’re used to using the computer in a very transactional manner, giving explicit instructions (move the mouse, pick the command, provide the instructions, finish the command, and so on.) Using Veras, you’re going to have to loosen up a bit, and not think about prompts as detailed and explicit instructions.
TIP: Once in a while, prompting creates unintended changes elsewhere on the image. If this happens, simply download your preferred image, then re-upload the same image. This download/upload step seems to create greater persistence and less unintended changes.
Try this: Imagine Veras is an extremely talented and well meaning Architectural Intern (Carbon-based AI ;). If you overload the intern with a lot of overly detailed, explicit instructions and information, the outcome is likely to be worse. Better to give them enough to get started (maybe with some precedence information and images) and ask them to check in when a stage is complete.
Let’s take the same approach with our new Silicon-based AI. Keep it loose, describe the general idea, look and feeling. You’ll be surprised with the results! Here’s the prompt used for the first pass at rendering only the building and context: early afternoon, even lighting, no people, no vehicles, office building, roof deck, please do not change the white buildings. Remember to render 3-4 times to get some different ideas. My preferred result is selected in Fig 05. Notice how Veras even interpolated the trees and other planting from the wireframe planting and trees in the base image!

Fig 05 Preferred Result
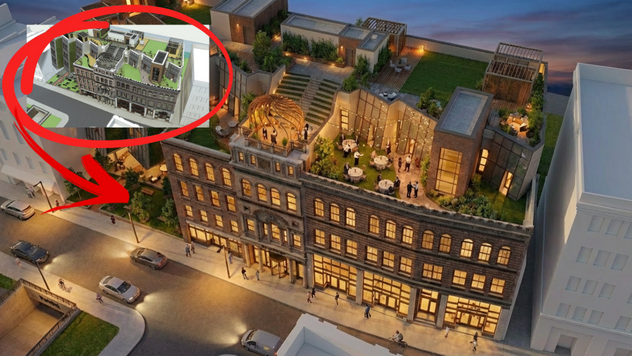
Next, let’s add some street level activity. Here’s the prompt: please add a few people and vehicles to the street level only. Side note: You may have noticed I use please and thank you in my prompts. There’s a reason for doing so! Just like you would with the carbon-based Architectural Intern. :) Figure 06 illustrates the preferred result.
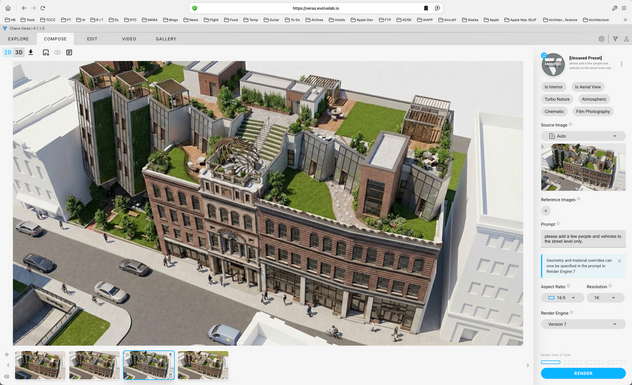
Fig 06 Adding Cars and Pedestrians to Street Level
Next, let’s experiment with the time of day. This is where Veras really shines. If you've ever tried to create a lantern effect inside of the building during late afternoon early evening, you know how tedious and time-consuming this can be to get a natural looking result. Using Veras, it simply takes a prompt and takes about 30 seconds. The results are outstanding!
Here’s the prompt: please keep everything the same except change the time of day to late afternoon, no sky. Even so, I got a few results with afternoon clouds in the background (hence the request for no sky in the prompt). The preferred result is shown in Fig 07.
TIP: Asking Veras to keep everything the same, except what you want to add to the scene, is useful for avoiding undesirable changes. Don't forget to say "Please" and "Thank You". :)
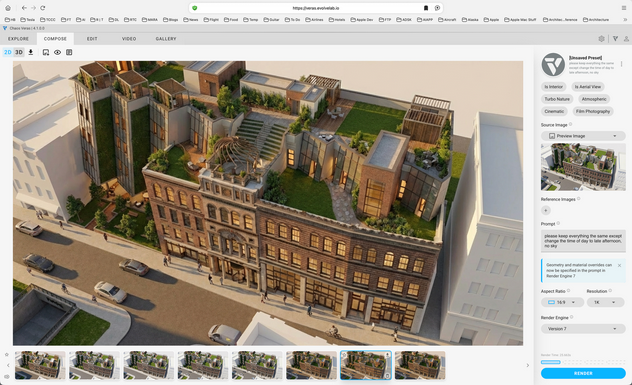
Fig 07 Late Afternoon Illumination
Being able to iterate is just one of the many unique and compelling advantages of using Veras. There’s more advantages listed over here. From the Edit tab, use the Sketch Tool to highlight a portion of the roof garden as shown in Fig 08. Here’s our prompt: please keep everything the same except change the time to early evening and add business function only in the red area.

Fig 08 highlighting Business Function Area
TIP: Veras is uniquely designed for iterative refinement! Rather than prompt and render all at once (good luck!), best to prompt and render in steps. This builds on the previous image and provides more predictable results.
Here’s the result (Fig 09). Notice that Veras added a few more people and illumination to the area under the center sculpture dome feature. Sometimes our silicon-based Architectural Intern exactly doesn’t do what you ask - but the result can be a “happy accident”, as Bob Ross would say. And the added sky adds to the tone of the image as well.

09 Rendering with Evening Reception
Here’s the final result (Fig 10). Imagine how long this take via traditional rendering and the following workflow:
Base rendering with materials
People, cars and lamp posts
Interior building and site Illumination,
String lights
Formal dining and reception area on roof
A few days and up to a week. String lights? Draped seating? Table center pieces? Are you kidding me?! You’d have to be a Revit Guru!
On the other hand, why model when you can describe? Total render time with Veras: 20 minutes!

Fig 10 Final Rendering
That’s it! Given that most architecture firms are small teams or solo practices (75% have fewer than 10 employees, and over 25% of all firms are solo practices) is Revit LT good enough? Maybe link the model via shared folders or Dropbox to federate documentation and other workflow? In any case, the considerable price gap between Revit and Revit LT (around $3000 vs. $560) is hard to justify if only used for using rendering plugins. Chaos Veras on the web removes this barrier and all you need is a simple screenshot to get started!
Now, what to do with all that left over cash? Buy the office a decent espresso machine! :)
We hope this tips and tricks article helps you and your team get the most out of Veras. Questions, suggestions or comments? Please add your feedback in the comments section below! :) And don't forget to Sign Up for Enscape Monthly Updates!
ReadThomaswould love to help you succeed with Veras, Enscape and your entire Chaos portfolio! Email us for a brief, private demo or best practices webinar for your team. And when you purchase from ReadThomas, we’ll provide your team with complimentary training, implementation and support! www.readthomas.com.
More from the author → Emerson Read on LinkedIn