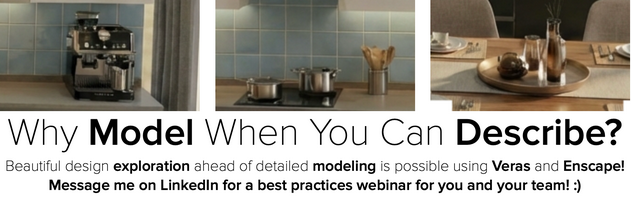
Starting from Scratch: “Unrendering” with Chaos Veras

Don’t spend days as-built modeling when you can start with a photo! Use Veras to quickly and easily remove fixtures, furnishings, equipment, and more from photos of existing conditions. Result? A clean space to test and perfect design ideas before you start modeling.
What’s the starting point of a renovation or tenant upfit project? Take site photos, document existing conditions, record measurements, and build an as-built model. This work is often speculative in order to illustrate earnest design ideas, with the understanding if the project goes forward all is well and you get the job. But what happens if the project doesn’t go forward? No hard feelings, that’s just the business of architecture and interior design. The client is doing speculative work as well, spending time with money trying to figure out if the project will work or not. Everybody is at risk together - how to minimize sunk costs and risk?
One option is bypass the sunk cost of building the as-built model and start designing with the site photos. Good idea in theory, but the space is often full of “stuff”: furniture, fixtures, equipment and more. There’s no point in opening Photoshop to try to “remove” all of the existing FFE. You might as well just start creating a clean as-built model. Wouldn’t it be great if you could design without committing to spending the time building a detailed as-built model?
This is where Veras really shines! Don’t start by modeling in order to render, start by rendering in order to design!
The first step is using Veras to un-render your photos. Using a simple text prompt, Veras will remove all the furnishings, fixtures, equipment, wall, coverings, and more in less than a minute from your existing conditions photos. In less than a minute, Veras will turn your cluttered as-built photos into beautiful and clean empty spaces, which you can use to to start designing with Veras.
Let’s get started! In the following scenario, we're going to reimagine the below conference room as an elegant reception area. You can right-click and download the below image if you want to follow along with this tutorial. We'll begin by un-rendering the space! :)

Existing Conditions
Log into Veras on the web (https://veras.evolvelab.io/) and upload your sample image. Don’t overthink the prompt - keep it simple! Remember, AI is just your silicon Architecture Intern. :)
Prompt: Please remove all furniture, fixtures and wall art from the image. Here’s the result (Fig 01). Remember, don’t just render one image after prompting. It's a good practice to render 3-4 images at once, and then pick your preferred image before proceeding to the next step.

Fig 01
Here’s the four resulting renderings from the above prompt. Total time about 20 seconds. None of the images are perfect, but I prefer the image to the upper right because the casework appears removed and replaced with a solid wall panel. The table in front of the casework is also removed. If I'd preferred the lower left image, I could have prompted again to just remove the table to get the preferred starting image.

Fig 02
Select the preferred image and let's proceed to the next step (Fig 03).

Fig 03
For the next step, let's add a modern reception desk to the space. It's unlikely to get everything from a single text prompt when you need very specific results. As mentioned in previous articles, it's a good idea to create each rendering one at a time, select the desired result, and then proceed to the next step. Overall, this step-by-step approach is faster and provides more control over the final result.
Prompt: Please add a modem reception desk to the right wall. After a few attempts, I selected the option shown below (Fig 04). Your result will vary from mine, which is fine. Keep going until you get a desired result.

Fig 04
Now that we have a modern reception desk with illuminated reveals, let's complement it with an elegant reception area. The reception area can't just look aesthetically pleasing, it has to be practical as well: comfortable seating, and a functional arrangement that feels relaxing and welcoming.
TIP: Have a specific reception desk in mind? Veras has you covered with the “Reference Image” setting. Upload a Reference Image of your desired reception desk and select the Object reference. This technique also works with reference Material, Color, and Style.
Prompt: Please add an elegant reception area. This rendering took a few iterations as well. But I was very pleased with the final result (Fig 05).

Fig 05
Next, let's add another chair to the scene using a specific reference image (below).

Prompt: Please do not change anything other than add one of the referenced chairs to the render. Here’s the result (Fig 06).
Did you notice what's remarkable about the result? In the reference image, the seating area faces the viewer. But in the resulting rendering in Veras, the chair if correctly oriented toward the center of the arrangement! How's that for a digital intern! :)

Fig 06
For the next step, let's add some art behind the reception desk. This hypothetical reception area is set in beautiful Sydney, Australia so let's tell Veras add to add some artwork, which references this history of Sydney.
Prompt: Behind the reception desk add artwork reminiscent of historic Sydney. This was my first time asking Veras to render a piece of decorative artwork and I was more than pleased with the result (Fig 07)!

Fig 07
The reception area is really starting to come together! This is where my personal favorite part of rendering with Veras comes in: little tweaks and adjustments. I may not have a background in Architecture, but I have an appreciation for beautiful design (as me about Singapore! :). These subtle additions turn a nice rendering into an amazing one.
While I really like the art behind the reception desk, I feel it blends in the wall and almost fades into the background. Let's an add some backlighting to make the artwork stand out and draw attention to the reception area.
Prompt: Please add backlighting behind the artwork behind the reception desk. Here’s the result (Fig 08).

Fig 08
Now let's clean things up a bit. A few steps ago I had asked Veras to render the reception area and I was pleased with the result. However, I think there's a lot of clutter in the form of lamps and vases. Don't start over! I knew it was possible to continue (ignoring a few undesirable elements) and then come back later for a final clean up.
This is where Sketch Mode comes in handy. I simply drew some sketches (all at once) around what I didn't want in the scene.
Prompt: Please remove the objects in the red area. (Fig 9).

Fig 9
For the final step, let’s add some people to the scene! The reception area looks lovely, but it's missing some finishing touches. Let's add some people to really bring it all together - an empty hotel reception area doesn't look very welcoming! Not too crowded through, just a few people.
TIP: Rendering isn't just about renderings. It's about communicating a lifelike and natural environment, which invokes an emotional response. Lots of applications create renderings; Veras adds life!
Prompt: Please add some people to the reception area, add a family with luggage in front of the reception desk. After a few renderings, here's my preferred result (Fig 11).
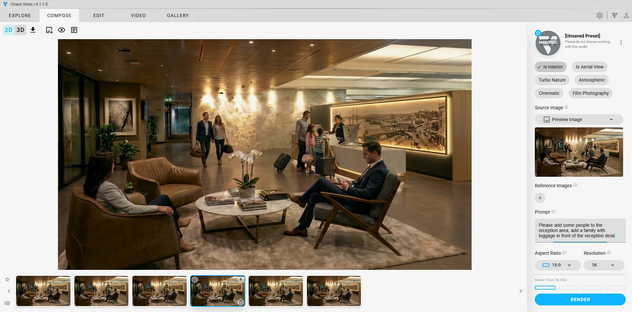
Fig 10
Here's the final rendering (Fig 13) in context with the original existing conditions (Fig 12). In only a few hours or less, we were able to repurpose a busy conference room into an elegant reception area!

Fig 11

Fig 13
In conclusion, creating an as-built model involves a lot of sunk cost if the project doesn’t go forward. Of course, if the project goes forward, you're going to have to eventually model to document your design decisions. But using Veras, you only need to start designing by describing. Result? Minimal sunk costs by rendering the design in context with existing site photos. Save the expensive as-built modeling after determining the project goes forward!
Go ahead and try for yourself! Use your own photos and see how easy it is to un-render furnishings, fixtures, and more with Veras. Post before and after pics in the comments!
We hope this tips and tricks article helps you and your team get the most out of Veras. Questions, suggestions or comments? Please add your feedback in the comments section below! :) And don't forget to Sign Up for Enscape Monthly Updates!
ReadThomaswould love to help you succeed with Veras, Enscape and your entire Chaos portfolio! Email us for a private demo or best practices webinar for your team. And when you purchase from ReadThomas, we’ll provide your team with complimentary training, implementation and support! www.readthomas.com.
More from the author → Emerson Read on LinkedIn