Veras for Post Production
Why use expensive and complicated photo editing tools with dozens of buttons and commands that take years to master? Using Veras and your imagination, simply describe what you want, click one button, and render beautiful results in seconds!
Imagine you're a designer working on plans, sections, elevations, details, schedules, submissions, and you're expected to render as well. Of course this is all possible with Revit, SketchUp, etc. and Enscape. The challenge is that you can't predict every subjective permutation for the final rendering. You can get close - but there's always last minute tweaks. Those last minute tweaks, only take minutes to describe, but hours to finish:
Stop what you're doing
Open the file in Revit, SketchUp, etc
Make the required lighting, material and geometry changes
Open Enscape
Render
Open the rendering in Photoshop
Add final touches
Done
Oh wait, can we just do this one other thing?
Ugh...
By the time you're done, it's dark, you're late, and dinner is cold. You did text ahead and let someone know you'd be working late, right? No? Oh sh...
But wait a minute you already had a beautiful base image, and a description of all the changes! You can't do it all in Photoshop, because that's the land of specialists who've spent years learning how to use all of those complicated buttons and commands in order to create the desired final image. There must be a better way.
The better way is Veras. Go straight from the conversation that describes what you want to communicate. No more design to render to post production. No more dozens of buttons and complicated workflow. With Veras, your imagination and a description is all you need before pushing one button: RENDER.
Here's a perfect example of a rendering of an automotive headlight in Envision. But what if you want to render a beautiful but imperfect rendering? As previously discussed, it's practically impossible to create imperfect images full of dust, dirt, patina, weathering and more. Simply export your perfect image, from Envision...

10/10 and Very Good Enough!
...and render with description of rain effects in Veras!
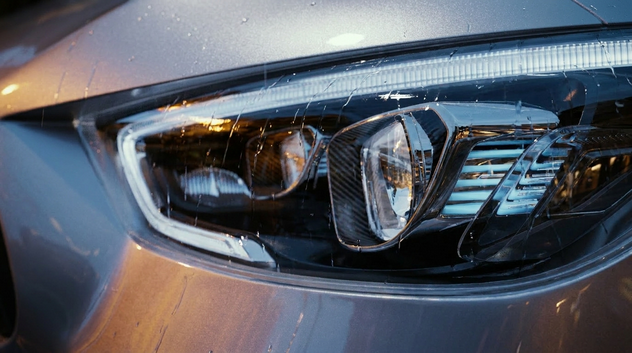
10/10 Turned Up to 11!
Adding rain and weather is just one of the post production effects quickly and easily created with Veras. Manually creating these effects in photo editing tools may not be impossible - but it’s highly improbable that you have the time, money, or ability to create these kinds of effects. You simply need to imagine and describe.
By the end of this brief article, you'll know how to create beautiful and natural looking post production effects in Veras. For example:
Desaturating areas of an image in order to create emphasis
Changing the time of day
Adding people and vehicles
Adding weather effects and changing the seasons
Ideating and adding geometry without complicated 3D modeling
Simulating motion blur
Putting it all together in a single prompt
If you were doing this in post production, imagine all of the buttons and commands you'd have to use. But what if there's not a button? With Veras, there's only one button to render and your imagination is the limit!
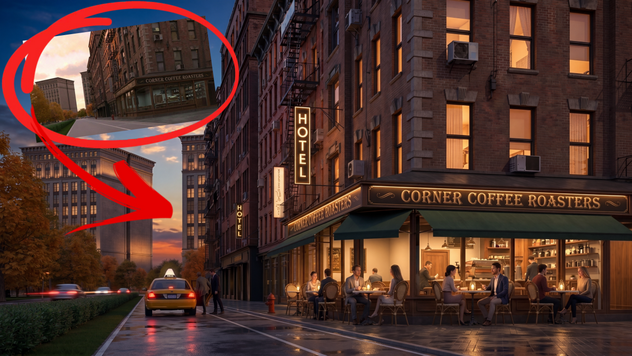
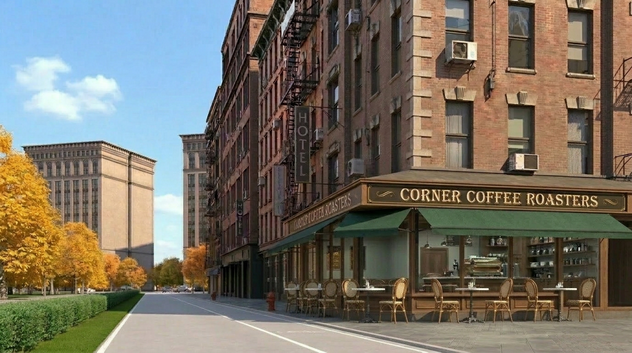
Starting Base Image
Big shout out to Josh Radle for providing the underlying image. His Envision rendering contains an enormity of detail, giving the image a natural and realistic feel. The eye-level camera location creates a photographic first person POV. The exterior of the building and signage subtly indicates the building serves as a low rise apartment block and hotel, with some corner, ground level retail. We'll center this tutorial around the retail shop.

Starting Base Image
On the other hand, we didn't like the corner shop (sorry Josh!:) Perhaps it seemed little too generic. So let's change it into something else! We decided to convert it into a coffee shop using Veras.
Prompt: Hey Veras, I’m not really too fond of the original design for the store in the rendering. Please replace it with a coffee shop. Not too fancy or commercially recognizable, simply a welcoming presence in the scene. Please add places for people to sit and enjoy their coffee as well as rows of coffee bags lining the right wall on shelves.
Result, complete with exterior signage, interior espresso machine, and retail elements. Now that we have a useful base image, let's start post production with Veras!

Modified Base Image for Rendering and Iteration
De-Saturation
Sometimes you want to emphasize the context in order to maintain interest on certain parts of a scene. You can even turn the context into a white museum board model. For this example, we're just reducing the saturation of the context around the coffee shop.
Prompt: Hey Veras, I’m looking to desaturate the space around the cafe so the viewer is not drawn away from the coffee shop. Please de-saturate the space outside of the highlighted area. Make sure to keep the saturation of the highlighted area the exact same. Do not add anything else to the render.
Here's the result. The context is black and white, while the coffee shop maintains all of its colorful elements.

Desaturated Context
Time of Day
Lighting is incredibly important for telling an emotional story. But predicting exactly what time of day should be displayed in the rendering often changes at the last minute! What if changing the time of day meant opening the model, framing the view, rotating the sun into the right location, and rendering the image. With Veras, simply describe the time of day and other features to create the desired rendering.
Prompt: Hey Veras I would like to see some iterations on different times of day for this render. Please change the time of day to the morning. Clear blues skies and warm tones. Do not change anything else.
Here's the results. Three different times a day, with all of the expected reflections, shadows, and corresponding illumination.

Morning Time of Day
Prompt: Hey Veras I would like to see some iterations on different times of day for this render. Please change the time of day to the afternoon. Sunny, bright and peaceful. Do not change anything else.

Early Afternoon Time of Day
Prompt: Hey Veras I would like to see some iterations on different times of day for this render. Please change the time of day to night. Cool blue, calm, and quiet. Please turn on some of the lights in the buildings but not all of them. Illuminate exterior signage. Do not change anything else.

Early Evening Time of Day
Adding People and Vehicles
Another subjective addition to renderings is people, vehicles, cyclists, and more. Using traditional rendering workflow, you'd need all of the assets, with correct clothing, hair, color, styles, and more manually inserted into the correct locations. With Veras, you simply describe the requirements and render.
Prompt: Hey Veras I would like to add some people to my original render. Please add customers inside the cafe relaxing and enjoying their drinks as well as people working at the cafe. Please add a few pedestrians along the sidewalk as well as people walking their dogs on the left side. Place cars on the road but not much traffic. Do not crowd the scene or change anything else.
Please take a moment and look closely. Not only have the correct elements been added to the scene, but there movement appears natural in life like. Consider the following details:
The person leaning their bike against the coffee shop as if to prepare to go inside.
The couple on the left side of the scene walking their dogs.
The barista with their back to the Camara wearing a barista apron.
This kinds of natural attention to detail is possible with traditional rendering tools (if you have all the required assets, experience, and time). For the most explicit control and storytelling this kind of manual control may be required (that's what Vray is for). But if you don't require such a level of detail and storytelling, Veras is fast, beautiful and easy to use.

Adding People and Cars
Weather Effects
Lighting compels the viewer to zoom into details otherwise lost. Reflections reference the passing of time and indicate a stillness and quiet. Perhaps a quiet before the day.
Prompt: Hey Veras, I would like to see some iterations on the weather for this render. Please change the weather indicate it rained overnight. Have a few people in the cafe, lights on. Do not change anything else.
Here's the results. Are you able to create these kinds of images in post production? Unlikely! But you're able to describe them and click one button using Veras.

After Rain Effects
Prompt: Hey Veras, I would like to see some iterations on the weather for this render. Please change the weather to a snowy day. It has just stopped snowing and there is a layer of grey slushie snow on the ground.
A Slushy Winter Day
Adding a Canopy
Of course you (or someone you know) probably has the skill set to create different canopy options and materials with 3D modeling and BIM tools. But what you really need to see is the idea before you commit to modeling. This kind of ideation and rendering is perfect for Veras!
Prompt: Please add a deep green canopy that wraps around the corner of the coffee shop to shade pedestrians from sunshine, snow and rain. Do not change anything else.
Here's the result. Notice the metal support elements are added as well.

Added Canopy to the Coffee Shop
Adding Exterior Tables and Chairs
So far the scene is beautiful and believable. But if we're going to spend money on exterior canopies, it would seem like a waste of an opportunity not to have some exterior tables and chairs!
Prompt: Please add cafe tables and chairs under the green canopy of the coffee shop. The backs of the chairs are ornate, consisting of bent wood and wicker. The small table tops are made of white marble and only provide space for 2 chairs per table. The tables and chairs are close to the exterior of the coffee shop in order to allow pedestrians to share the canopy and easily pass. Do not change anything else.
And here's the result. Note the suggestion of center elements (sugar, creme, and napkins?) on the tables.
Added Exterior Table and Chairs
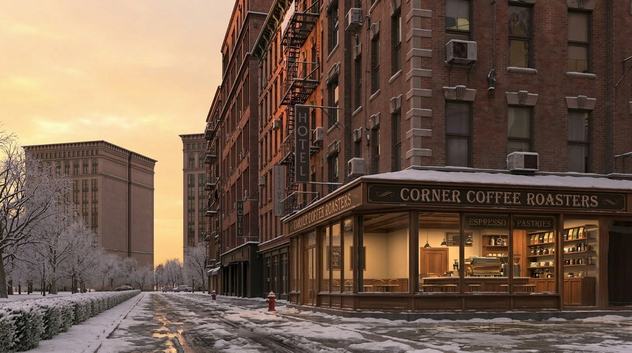
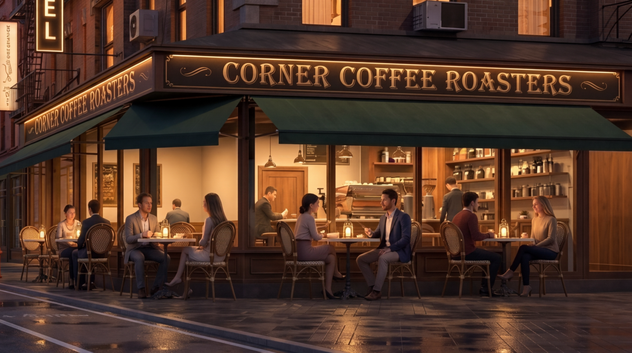
Putting It All Together
As previously discussed, it's a good practice not to prompt everything at once. In order to have more control, it's better build up the image with a series of descriptions, rendering 4X, and selecting the most preferred image. Repeat the process until achieving the final image.
However, it is possible to describe a series of requirements in a single prompt. Rather than write the prompt in long paragraph form, I found it's better to create a series of bullet points describing the requirements. This helps locating a specific bullet point description for future tweaking. Let's create a single uber prompt starting with our last image and create a final image with all of the requirements!
Hi Veras, please make the following changes to the image. Don’t change anything not requested.
Time of day to dusk with slightly dramatic and colorful sky
Rained a few hours ago and the ground is slightly wet and reflective
Illuminated interior of buildings and exterior signage
Add people relaxing inside and outside the coffee shop
Add cars with Illuminated tail lights and slight motion blur
On the right side of the road in the distance, someone is opening the door of a yellow taxi for another person to get in before getting in themselves.
Illumination at the center of each exterior cafe table, gently illuminating the faces of the customers sitting at the table. The customers are neatly dressed in casual business attire. Couples sitting at each outdoor cafe table.
Overall: The feeling of the scene is a relaxed and intimate coffee shop that doesn't rush its customers, but welcomes them to enjoy their coffee and pastry, and the overall experience. Maybe fall in love. :)
Thanks!
Here's the result. If you've ever had to manually and painstakingly create these kinds of effects and post production, you'll appreciate the final image. And if you've never had to create these kinds of effects in photo editing post production, now is a perfect time to learn how to use Veras!

Putting It All Together with People, Lights and Sense of Activity
One more detail! Iterating at 1K or 2K resolution is the fastest and most efficient way to utilize render credits with Veras. But in the process you'll notice some features (particularly faces), are not as clear as they should be. For this last last step, let's upsample our final, desired image to 4K resolution.
Prompt: Please keep everything the same but only make the faces more photo realistic.
Here's the final upsampled image at 4K resolution. Some of the detail might not be immediately obvious.

Upsampling to 4K Resolution
Look closely and pay particular attention to the before and after detail in faces upsampled from 1K to 4K resolution.

Before: 1K Resolution Detail
After: 4K Resolution Detail
As a design professional, you're routinely tasked with managing the complex production of plans, sections, elevations, details, schedules, and submissions, and even high-quality renderings. Of course, this may be technically possible. But it's difficult to anticipate all of the likely iterations and tweaks based on last minute client requirements. How many times have you heard, "Can we make the grass a little less greener?" or "Can we make the sky a little more blue?" No more Revit>Enscape>Photoshop workflow. Starting today, you'll simply open the previously created image with Veras. Your imagination is the limit and it only takes one button: RENDER! :)
We hope this article helps you and your team get the most out of Veras. Questions, suggestions or comments? Please add your feedback in the comments section below! :) And don't forget to Sign Up for Enscape Monthly Updates!
ReadThomaswould love to help you succeed with Veras, Enscape and your entire Chaos portfolio! Email us for a private demo or best practices webinar for your team. And when you purchase from ReadThomas, we’ll provide your team with complimentary training, implementation and support! www.readthomas.com.
More from the author → Emerson Read on LinkedIn